I wanted to share NRW Charging Atlas with someone planning a charging rollout and let them try a district they know. The full application was already there, from the Python data pipeline and PostGIS model to the map, data catalog and proposed-station scenarios. But the GeoNode stack, though feature-rich, is a bit heavy for an ordinary laptop, so asking someonew who’s not an engineer to install Docker and bootstrap that stack before they could look around was a lot to ask.
Spinning up the same containers on a server would spare visitors the installation. But it would also leave me running a database, GeoServer and GeoNode for a demo whose first job was to let people explore the district evidence. I had to decide how much of the application that first visit actually needed. While GeoNode is a strong key-ready choice for our functional requirements, it comes at the cost of slightly elevated resource requirements, which, to be fair, are still lower than what you need to run Slack or Mirosoft Teams.
The live deployment is available at nrw-ev-atlas.zhittsova.com. You can directly compare North Rhine-Westphalia’s 53 districts and inspect the inputs behind their charging indicators in your browser. The rankings I’m providing are intened to help you choose where to investigate. A site-level business case still needs demand, grid-connection and financial evidence - this is a prospective follow-up task.
In this post, I explain how I split the work between a temporary data-processing job and a static website, then set up Terraform, GitHub Actions and a PR-based release workflow. In the project article, I explain my scoring model. In the local walkthrough, I show how you can test proposed stations and explore the GeoNode catalog.
Explore the public atlas
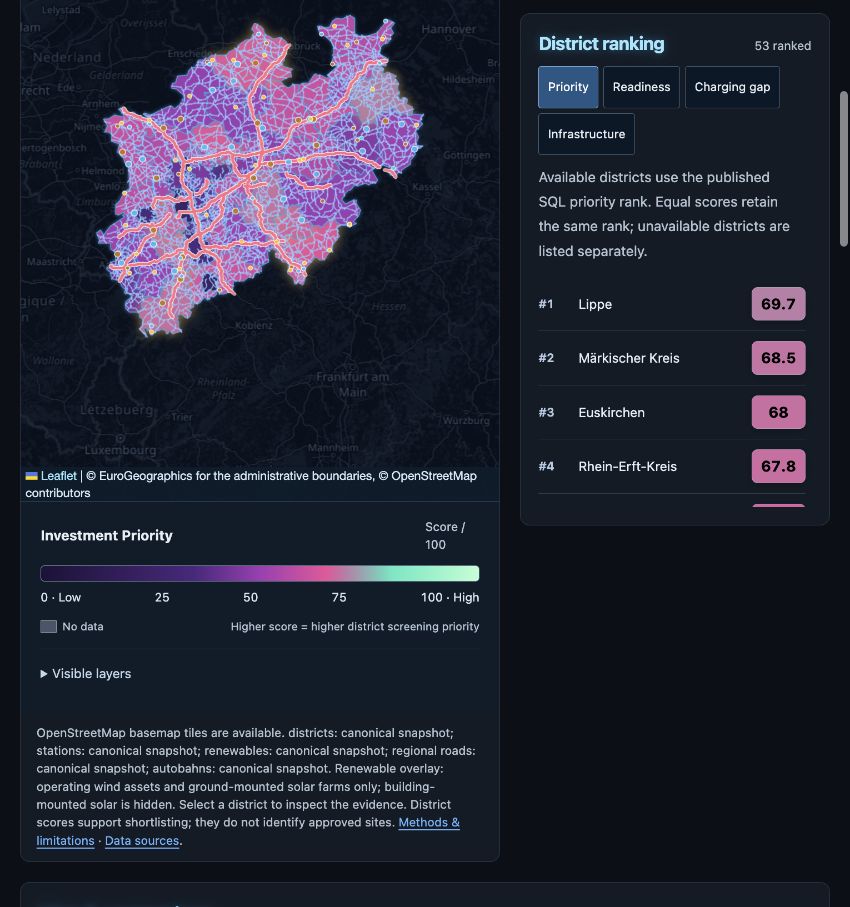
The public map after the first deployment on 15 September 2026. Boundaries: © EuroGeographics. Basemap and OpenStreetMap-derived layers: © OpenStreetMap contributors.
What could I leave out of the hosted demo?
As I mentioned, GeoNode is relatively heavy - its full local setup calls for at least four CPUs and 4 GiB of memory allocated to Docker, with memory left for the host and browser. The first run downloads roughly 1 GB of source data to populate the data store, on top of the container images and database storage. Those are the documented local resource requirements, rather than a sizing estimate for a busy production service.
Those services support the full application. PostGIS performs the spatial joins and calculates the district scores. GeoServer exposes the layers through geospatial services. GeoNode provides a catalog with dataset metadata, and the application saves proposed stations so a planner can compare scenarios across sessions.
For a production target, this is exactly right. But for a public demo, I reckoned I could make a smaller promise: open the map, compare districts and inspect the evidence. Once I settled on that, three features no longer needed a hosted service:
| Feature in the full application | Decision for the public demo | Effect on hosting |
|---|---|---|
| Save proposed stations and recalculate scenarios | Keep proposal editing in the local application | No visitor writes, scenario database or account ownership to manage |
| Browse the GeoNode dataset catalog | Keep source attribution and district evidence in the public build | No running GeoNode application |
| Request layers and scores from GeoServer and PostGIS | Export the calculated results as GeoJSON | No live geospatial API or database behind the map |
Retaining its major presentation functionality, Atlas visitors can still compare districts and inspect their scores. Leaflet draws the exported layers, and the browser handles district selection and ranking changes. A demo visitor wouldn’t need a new spatial query each time they choose a different indicator.
That let me reduce the published dataset down to about 34 MB across five GeoJSON files and a manifest, plus the frontend assets. This was a big win, but I still needed PostGIS to produce those static files, yet only while refreshing the data. GitHub Actions could run that job and shut the database server down when it finished. Cloudflare Pages would then serve the output as a static site.
As it turned out, this was the deployment design that made free hosting practical. I kept the full-stack application available locally and built a read-only public version around the derived, narrower use case. Supporting shared online scenarios later would mean revisiting storage, access and ownership of each visitor’s proposals.
| Work/Task | Where I run it |
|---|---|
| Download inputs, import data and calculate scores | Temporary PostGIS stack in GitHub Actions |
| Export and validate the GeoJSON files and manifest | The same Actions runner |
| Build the frontend and run browser checks | GitHub Actions |
| Serve HTML, JavaScript, CSS and the exported data | Cloudflare Pages |
| Select districts and change the ranking | The visitor’s browser |
I kept OpenStreetMap tiles as an external basemap dependency. If the tiles fail to load, the district layer and rankings still work. I also show the export date in the interface and keep the individual source dates in the evidence panel. Regenerating a snapshot doesn’t make every underlying source new. Crucially, it’s all automated.
Run the data pipeline when the data needs refreshing
I already had Python importers and a tested SQL model, so I simply reused them for the public export. Moving the calculations into JavaScript would have given me a second implementation to keep consistent with PostGIS - an avoidable maintenance and correctness burden. Instead, the public ETL command downloads the inputs, refreshes the database, verifies the results and exports the runtime files - pushing it down to the infrastructure layer while retaining consistency, rather than up into the presentation layer:
docker compose -p nrw-public-etl-local \
  -f config/compose.public-etl.yml run --build --rm etl

docker compose -p nrw-public-etl-local \
  -f config/compose.public-etl.yml down --volumes
Run these commands from the repository root. The example refreshes data/raw and data/runtime.
If you want to keep an existing local export, you can use the path overrides in the
hosting guide.
The cleanup command removes the disposable database for this dedicated ETL project.
In GitHub Actions, I give each run its own Compose project name. The job starts PostGIS without publishing a database port, mounts the input and export directories, then removes its containers and database volume when it finishes. Only the packaged output goes to Cloudflare.
This is truly a DevOps-driven static-site generation (SSG) approach for the GeoNode stack.
I also wanted to avoid downloading about 1 GB of raw inputs just to change a heading or fix a layout. So, for
frontend-only changes, the workflow downloads the previous export from the project’s pages.dev address and validates
it before reuse. Missing files, failed checksums or an incompatible scoring formula send the job through ETL again.
Curiously, I ran into a Cloudflare-specific problem when I tried that download after publishing. The site opened
normally in my browser, but Python’s default downloader received error 1010. That would have made every affected
snapshot-recovery attempt fall back to a full data refresh. After a bit of debugging, I gave the downloader an explicit
nrw-charging-atlas/1.0 User-Agent and reran the deployment with data refresh turned off. The download passed
validation, the workflow skipped ETL, and Pages received the rebuilt frontend with the existing snapshot.
| Trigger | Data work |
|---|---|
Frontend-only change merged to main | Reuse the last compatible public export |
| Change to SQL, ETL scripts, source catalogues or relevant configuration | Rebuild the data |
Manual run with refresh_data=true | Download and rebuild |
| Monthly schedule, when enabled | Download and rebuild |
To avoid collisions and CI churn, I decided to leave the refresh schedule disabled for the first release while I checked the manual refresh and snapshot-reuse paths. I simply added a repo var flag for the workflow to easily control it. Even with a schedule, I want readers to be able to check the export and source dates because an upstream download can fail or contain older observations. This way the Atlas data sources are fully transparent and can be independently validated.
Set up Cloudflare Pages with Terraform
To reproduce this setup, you’ll need a Cloudflare account, its account ID and an API token with Account -> Cloudflare Pages -> Edit, scoped to that account, which you can directly create in Cloudflare UI. I created the token in the
Cloudflare UI. The account ID tells Terraform where to create the project, while the token grants access. See the
Cloudflare Terraform provider docs for
authn options and Cloudflare’s CI setup
instructions for the
Pages permission requirements.
To make provider installation reproducible locally and in CI, I always commit .terraform.lock.hcl, which records the
selected provider version and package checksums, so a later terraform init uses the same selection instead of silently
picking a newer release allowed by the version constraints. HashiCorp explains this in its dependency lock file
guide. I can then review provider upgrades in
a PR and Dependabot or Renovate can keep the module dependencies up to date via auto-merge PRs.
With Cloudflare Pages, the infrastructure-as-code (IaC) setup is really simple. I only need a project and its custom domain:
For details, check out the provider docs:
I set prevent_destroy on the project to make an accidental deletion fail during planning.
Cloudflare Pages supports Git integration and Direct Upload, among other deployment options. I’ve opted for Direct Upload so GitHub Actions can deploy the site after preparing and checking the data - in one workflow. Keeping the ETL refresh and deployment in one workflow means I can follow a run from the source download through to the public map. If you’re curious about the upload setup, Cloudflare walks through it in its CI deployment guide.
In the end, it boils down to: Clone the repository, install the
Terraform version in infra/cloudflare/.terraform-version1, and copy the example variables:
cp infra/cloudflare/terraform.tfvars.example \
   infra/cloudflare/terraform.tfvars
In terraform.tfvars, fill in your account ID and use project and domain names you control:
account_id          = "YOUR_32_CHARACTER_ACCOUNT_ID"
project_name        = "your-atlas"
domain              = "atlas.example.com"
zone_id             = null
manage_deploy_token = false
This file will be saved on your machine, but it’s in .gitignore and .dockerignore, so won’t be checked into the
repo. While the Account ID is not a secret, it’s important to keep secrets out of unsecured storage.2
Keep the token out of the configuration
The provider accepts
CLOUDFLARE_API_TOKEN from the
environment. On my Mac, I store such dev tokens in Apple Keychain so I don’t need to keep it in a project file or a
remote secret store, such as AWS Secrets Manager, AWS Parameter Store, or HashiCorp Vault. I retrieve it once when I
need to run Terraform, temporarily populate the environment variable and unset it afterward.
An external secret store with token rotation would be a stronger approach for a shared deployment setup. Short-lived credentials can reduce exposure where the provider and authentication flow support them. I haven’t added that integration here. For this one-dev deployment, Keychain and a GitHub environment secret keep the setup manageable.
Here’s how to retrieve an existing Keychain entry by its service name. Replace the placeholder with the name you used. Command substitution captures the token instead of printing it to the terminal. Keep shell tracing off while running these commands:
export CLOUDFLARE_API_TOKEN="$(security find-generic-password \
  -s 'YOUR_KEYCHAIN_SERVICE_NAME' -w)"

terraform -chdir=infra/cloudflare init
terraform -chdir=infra/cloudflare plan
terraform -chdir=infra/cloudflare apply

unset CLOUDFLARE_API_TOKEN
On another operating system, you can retrieve the token from your secret store or enter it through a silent prompt. Temporarily putting it in an environment variable still makes it available to Terraform and its child processes, so I keep that shell session focused on the infrastructure task.
I follow the usual .gitignore convention for local .env and .tfvars files, along with Terraform state and plan
files. The repository keeps example variables without credentials and commits the provider lock file. Ignoring files
helps prevent accidental commits, but it doesn’t protect a file that’s already tracked or encrypt anything on disk.
Why I created the token manually
Terraform can create the deployment token too. I included an optional configuration that looks up Pages Write by
name through cloudflare_account_api_token_permission_groups, then creates an account-scoped token. That lets me avoid
copying unexplained permission IDs into the code.
I decided to leave that option off for this Cloudflare Pages app - for two reasons: creating an account token needs a separate credential with Account API Tokens Write, and Terraform stores the generated token in state. A sensitive Terraform output hides the value from normal terminal output, but it doesn’t encrypt the state file. I’d then need to secure the token-bearing state and manage a separate bootstrap credential, which adds work I don’t need for one Pages project. Usually you would store your remote Terraform state in a secured S3 bucket, which would be safe by many measures.
The optional token configuration is there if I want Terraform to own that lifecycle later. And the Cloudflare token API and Terraform’s sensitive-data guidance explain the permissions and state-handling implications.
Keep DNS with the existing provider
I defined the subdomain nrw-ev-atlas.zhittsova.com so the address tells you which project you’re opening. Because it’s
a subdomain, I could keep DNS with my existing provider and merely point a CNAME at Pages. Using the apex domain on the
other hand would require a Cloudflare zone, as Cloudflare explains in its custom-domain
docs - another unnecessary complexity to shave
off for this project and minimize the infra complexity.
When applied, Terraform directly registers the defined custom hostname with Cloudflare Pages. I then add the CNAME at my DNS provider, using the target from this output:
terraform -chdir=infra/cloudflare output dns_record| Type | Name | Target for this deployment |
|---|---|---|
| CNAME | nrw-ev-atlas | nrw-ev-atlas.pages.dev |
If you choose to reproduce this deployment and self-host my Atlas, just use the hostname Terraform returns for your project because Cloudflare can assign a different one. Both steps matter here: Pages needs to know about the custom domain, and DNS needs to send visitors there. The benefit is that I could make that change without moving the blog’s root domain or mail records.
Give GitHub Actions the configuration it needs
I keep ordinary configuration in repo vars and the deployment token in the cloudflare-pages repo environment.
The workflow reads those from vars and secrets respectively:
| Variable | GitHub location | Value |
|---|---|---|
CLOUDFLARE_ACCOUNT_ID | repo var | your account ID |
CLOUDFLARE_PAGES_PROJECT | repo var | Terraform project name |
ENABLE_SCHEDULED_ETL | repo var | false initially |
CLOUDFLARE_API_TOKEN | secret in the cloudflare-pages env | the Pages Edit token |
After gh auth login, I can finally configure a checkout with the GitHub CLI and pipe the token straight from Keychain
into the env secret, so the secret never populates your copy buffer. Replace the example values with your own:
gh variable set CLOUDFLARE_ACCOUNT_ID --body YOUR_32_CHARACTER_ACCOUNT_ID
gh variable set CLOUDFLARE_PAGES_PROJECT --body your-atlas
gh variable set ENABLE_SCHEDULED_ETL --body false

repo=$(gh repo view --json nameWithOwner --jq .nameWithOwner)
reviewer_id=$(gh api user --jq .id)
gh api --method PUT "repos/$repo/environments/cloudflare-pages" --input - <<JSON
{
  "reviewers": [{"type": "User", "id": $reviewer_id}],
  "prevent_self_review": false,
  "deployment_branch_policy": null
}
JSON

security find-generic-password -s 'YOUR_KEYCHAIN_SERVICE_NAME' -w |
  gh secret set CLOUDFLARE_API_TOKEN --env cloudflare-pages

gh variable list
gh secret list --env cloudflare-pages
For this solo project, when setting up the repo environment cloudflare-pages, I made myself the required env reviewer
and allowed self-review. That gives me an approval point before a deployment job receives the token. The environments
PUT command above sets up that setup for a new env. If you already have protection rules, you should inspect them first
and preserve the ones you need. GitHub documents the fields in its environments
API.
The final two gh commands let you check the variables and secret names without revealing the stored secret value. The
account ID needs to be a repo var for this workflow. Putting it only in secrets won’t satisfy the
vars.CLOUDFLARE_ACCOUNT_ID check.
Take a change from a PR to the public map
I wanted to keep working locally, push a branch to GitHub and release through a reviewed PR. As usual, the repository
checks run before merge, and merging a relevant change to main starts the public workflow, which pauses at the environment
approval before building and deploying.
In the complete workflow, I define the project checks, data selection and upload in this order:
verify Cloudflare Pages project and token
  -> test and build the public frontend
  -> recover a compatible snapshot or run ETL
  -> validate and package the static files
  -> run desktop and mobile browser checks
  -> confirm this commit is still current main
  -> upload to Cloudflare Pages
You can run the public build and browser checks locally too:
cd frontend
npm ci
npm test
npm run build:public
cd ..
python3 -m scripts.public_site prepare
cd frontend
npx playwright install --with-deps chromium
npm run test:public
Note that npm ci relies on the npm package-lock.json file just like Terraform does with its module dependencies, as
opposed to npm install or npm i.
The packaging step needs a valid runtime export from ETL or the published site. I first limit the package to the five expected GeoJSON files, their manifest and source attribution, then check hashes, feature counts and the scoring formula version. That gives me a predefined set of files to publish from a workspace that also contains raw data and local infrastructure state.
After those checks, the workflow uses the pinned Wrangler npm dependency to upload the site:
- name: Deploy static assets to Cloudflare Pages
  working-directory: frontend
  env:
    CLOUDFLARE_ACCOUNT_ID: ${{ vars.CLOUDFLARE_ACCOUNT_ID }}
    CLOUDFLARE_API_TOKEN: ${{ secrets.CLOUDFLARE_API_TOKEN }}
    WRANGLER_SEND_METRICS: 'false'
  run: npx wrangler pages deploy dist --project-name "$PAGES_PROJECT" --branch main --commit-hash "$GITHUB_SHA"
This step is part of the full workflow. The enclosing job supplies PAGES_PROJECT and selects the cloudflare-pages
environment. To request a fresh dataset explicitly, just run the workflow on main with refresh_data=true:
gh workflow run public-pages.yml --ref main -f refresh_data=true
gh run list --workflow public-pages.yml --limit 5
You can do the same in the GitHub UI too.
After a couple of failed attempts, I managed to configure it such that code changes and data refreshes share one
deployment queue. Just before upload, we check that the run still points to the current main commit. If a newer commit
arrived during a slow ETL run, the older run stops there. A failed build leaves the previous site available, and I can
use a Pages rollback if I discover a problem after publication.
This way, the project has a release flow that I can inspect in Git. The PR records the change, Actions records the
build and data checks, and the Pages deployment identifies the source commit. This provides a release audit trail. And
Terraform manages the Pages resources separately through the plan and apply steps as shown above.
Keep the ongoing hosting cost at zero
Having compared several alternatives, I chose Cloudflare Pages for the public build because Cloudflare currently offers free, unlimited static asset requests when they don’t invoke Functions. I don’t need a request-time backend for this version of the atlas. The package checks directly reject Functions and Worker output, and the project preflight rejects backend bindings. Cloudflare explains the separate Functions billing in its pricing docs.
For ETL and deployment, in Actions I just use a standard Ubuntu GitHub-hosted runner in the repo - its execution is free under the current GitHub Actions billing rules. I also avoid uploading Actions artifacts or creating Actions caches in this workflow. Other workflows and private repositories have their own usage, so I configured an Actions budget to stop paid overage. My existing domain and GitHub subscription are separate costs.
Free hosting still has limits. I have to check that each file stays within 25 MiB and that the site has at most 20,000 files. If an export grows past either limit, the build fails and I have to revisit how I package the data. The workflow won’t provision a database or storage bucket to compensate. These are the provider terms and limits I used for this deployment, rather than a promise that pricing will stay the same forever.
Let someone follow a ranking back to the data
Importantly, as I publish the export manifest alongside the GeoJSON, anyone investigating a ranking can readily check the generation time, formula version and layer provenance. The browser reads that same manifest.
The first successful deployment rebuilt the data from public inputs and passed all four desktop and mobile smoke tests before upload. That export contains 53 district features and 22,475 charging-station features. These counts describe the snapshot. They don’t tell us whether every station is operating right now or whether the source includes every recent change.
For the Terraform resources above, I embedded a GitHub Gist pinned to a specific revision. The other examples stay inline, with language labels, line numbers and links to the source. GitHub Actions artifacts have retention periods and download-access requirements, which makes them awkward as long-lived blog embeds. You can check those conditions in GitHub’s artifact download guide. The snippets remain readable in the article, while the source links let you inspect the rest of the implementation.
Try a district you know in the public atlas, switch between Priority, Readiness and Charging gap, and open the evidence behind the ranking. If you want to add a proposed station and compare its effect, I show that in the local walkthrough. For an initial look at the project, you can now send someone a URL and let them explore.
Footnotes
-
I use
tfenv-brew install tfenv, butmiseworks too -brew install mise, or you can simply pick your otherwise managedterraformdistribution, e.g.,brew install terraform. ↩ -
Alternatively, you can use env vars with Terraform, which have lower precedence than
terraform.tfvars:TF_VAR_account_id,TF_VAR_domainand so on. In contrast to tfvars files, this is ephemeral but can still be read by processes running in the environment. Make sure to keep*.tfvarsin.gitignoreand.dockerignore. ↩